Outcome Development
- May 15, 2019
- 7 min read
Updated: May 27, 2019
At the beginning of May, I started to work on my outcome.
Target 1: Connect the LED strips


The LED light strip that I bought is Philips's cuttable one, but there was no official connector provides for the cut strips. Therefore, I bought the connector that sold by another company, but the reviews were not really good because many people reflected that after using the connector the light strips then could not change the colour anymore. Fortunately, there was a buyer posted a instruction of how to make it works. Although the clips were still a bit loose, the light colour still can be changed if I connect the joints firmly.
Target 2: Stick the plastic panels
My original plan was using both Gorilla's superglue and hot glue, but in the truth was that the superglue cannot hold the big pieces. Therefore, I just used the hot glue for the large pieces.


For the large box, I used the both superglue and glue gun first, but I found the superglue will leave the prints on the panel. To remove the prints, I used both warm water and mineral oil. However, for the glue blocks at the edge, I planned to use the electric hot air blower to soften them first and them adjust with the wood stick with the help of the video above.
For the box in the middle, on account of I will put liquid paraffin inside, I need to ensure that the box is perfectly sealed. However, I after testing the box with containing the water, I found that it had not been completely sealed, despite there were two layers at the bottom. Hence, I planned to drill a hole in the bottom of the box and pour the liquid beeswax to block the whole space inside.
For the small plastic pieces as in the third picture, I would use a tape to strengthen the structure after gluing with the superglue.
UPCOMING PROBLEMS
Next day when I checked the large box, I found that the glue on the corners was broken by the stretching force. Therefore, I used the knife to remove most of the glue on the panels and tried to think another way to seal them. Firstly, I had to consider how to remove the prints on the panels completely. By the suggestion of Hao, I searched the glue remover and decided to use it to have a try. Secondly, I realised that the space in my room was too small, so I would bring all the materials to college and continue working.

Meanwhile, the black part on the disc showed some white traces, I supposed it is because I did not evenly apply the primer on it. I researched the better methods online and I found that the sleeve roller could be a good choice.
With mention to the box in the middle, after I mended the leaking area and re-tested again, the situation still had not been solved. Then I planned to make a new one, so I was going to order some more plastic pieces. Meanwhile, I conceived a new idea which is sealing the corners with primarily the PVA glue, and then the silicone sealant. However, I still need to experiment the effectiveness of PVA glue and the new super glue that I just bought. In addition, I would continue the design of two bottom layers and infusing with the beeswax between them.
For the last small one, when I checked the peephole again, I found that the sight was blocked by something. Hence, I had to violently open it and I saw the glass is covered with a shell of super glue. Luckily, I searched the way of removing the super glue print and I just got a bottle of mineral oil, which can alleviate the print. I was also reminded that to prevent fallen of the concave mirror, I should make a base by hot glue first and then stick the mirror to the base.
INSTRUCTION
To prevent any problem that will occur in the making process, I thought I need to carefully plan each step first. So I am going to write some notice points for every section to remind me when I begin to assemble them.
BOX 1
This box has the same effect as the prism cube, which can reflect the light. Because its size is quite small, I can directly use the super glue to stick the plastic pieces. As I checked the pipe for connecting two sides, I found the most suitable one has 32mm inner diameter and around 37mm outside. In general, I think there will not be difficult to make it.
BOX 2
The main problem of this box is waterproof because I will pour paraffin oil into it, it must be completely sealed. I would firstly experiment the effectiveness of PVA and superglue, then use the best one to hold its shape. Secondly, I would use the sealant to seal the bottom corners and hot glue for the other corners. Thirdly, I would put beeswax at the bottom and then strengthen the shape by waterproof tape.
BOX 3
The most difficult part in this box is that the panels are not 180 degree flat. Therefore, I need the help from another person who can help me to quickly dry the glue while I am holding them. Next I should use the mirror cleaner to ensure the surfaces are clean. The discs should be sealed at last, I think hot glue would be a good choice.
BOX 4
Finished!
Experiment of Glues

n account of the experiment of sealant would take a long time, so I just experimented the super glue. I found that the PVA was only available for absorbent materials. I used three pieces of mirror plastic which have same size to test. Finally the Loctite's super glue took less time than the others and also really strong. Therefore, I mainly used it in the process.
Next Step
Black Disc


I applied several layers of black paint by the roller and it worked effectively.
Glue Prints

To remove the hot glue print on the panels, I firstly tried the mineral oil but it did not works well. Therefore, I bought a bottle of glue remover on Amazon and used it in instruction. In the second time, I had removed almost all of the glue prints.

I also tried the ultra fine steel wire as I did on the glass, but the plastic seemed not as hard as previous one, so it was easily to scratch the panel. Hence, I did not use it anymore.

Construction
BOX 1

Although I had made one, the sizes of the plastic pieces were not correct. Therefore, I re-ordered some new pieces and made a quite good prism cube.
BOX 2
Same as the Box 1, I also remade one without gluing the inside faces with hot glue, but used the sealant outside.

To applied the sealant evenly, I thought I can make a finishing tool. However, as I found the professional one on the Amazon, I changed to use that silicone-made one.


To prevent the glue and sealant leak to another side, I used masking tape to restrict the area. The final result was quite nice, but I did not precisely make every edge neat as a beginner.
BOX 3


Same as the box 2, I used the similar method to seal the edges. To prevent the situation that occurred last time, I used the Gorilla tape to bond the panels together.

Next day, I had cleaned the glue prints on the surfaces already.


I was deeply amazed by the effect after I assembled them all together. The light created a really amusing tone in the box and the black of the circle was truly so black. The next stage of the box would be putting the LED light groups on the outside and the problem of the connection of Philips' light strip was always a tough one for me to solve. In May 20th, I went to some electronic shops but their feedbacks were not able to fix it. However, there was still the illumination I got while talking with the technician. I tried to pull out a little bit of the strips and all the joints were surprisingly conducted. Therefore, I decided to pull every part a little bit out and use the tape to fix it. Meanwhile, I planned to order a thin plastic panel to stick the strips on it, so I can take the panel out to adjust any time I want.

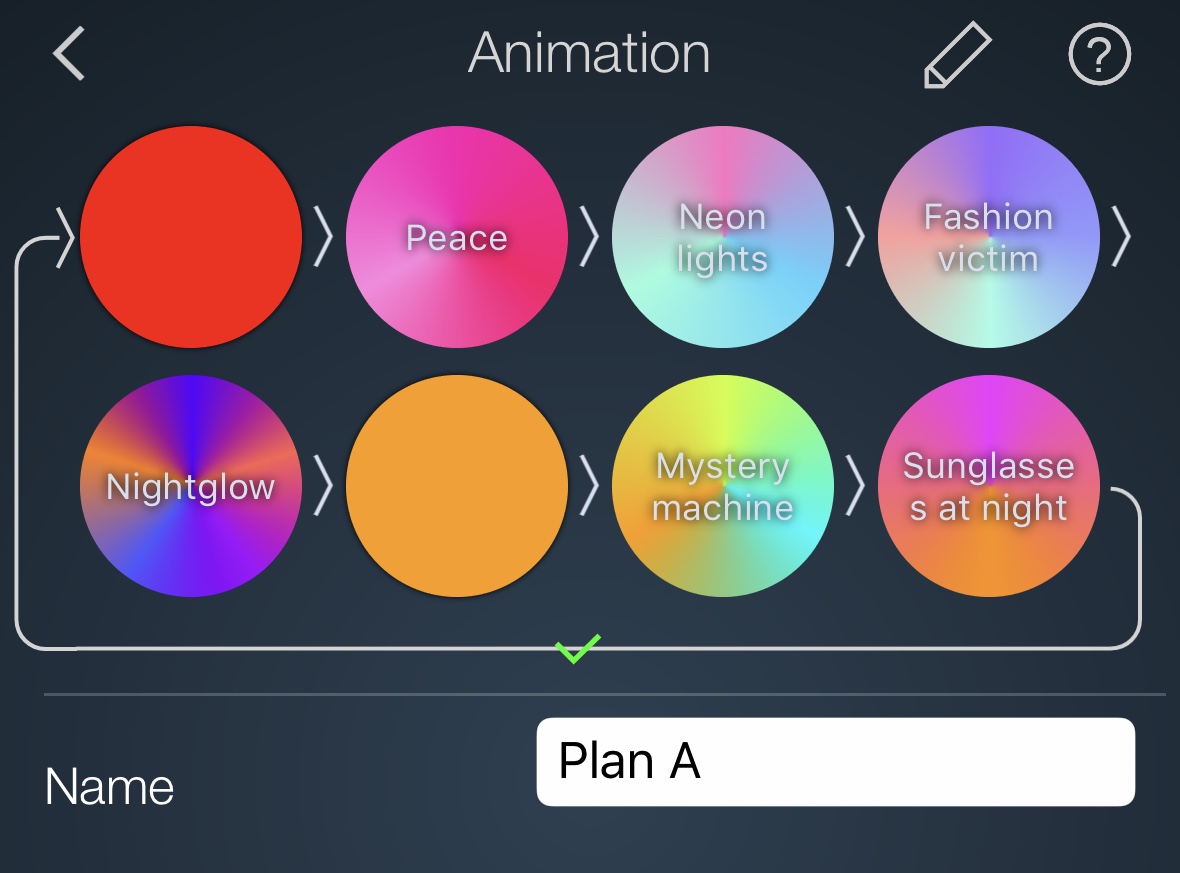


Next, I set the animation of the light strip, which was starting in red and ending in orange. I did not specifically planned the setting of each section, but got some colours in my mind as the key elements.
RED (as the blood)/ YELLOW (as the road lamp)/ Pink (as the cloud

Then I stick the light strip on a thin plastic panel.
Outer Box


The outer box was the most exhaustive part because the panels were not really flat, so I had to find a person to help me. Firstly, I applied a layer of primer on each panel to prevent scratching. Then I painted the bottom one with the black paint to separate the layers. Thirdly, I tried to glue the them with the Loctite's super glue, but it did not works well on the large pieces. Therefore, we had to use the glue gun to bond each part first while we were pressing the panels to make it more flat. Lastly, I sealed the edge with the sealant and used the books to hold the structure.

The difficulty of bonding the "wormhole" was the bent edges. To stick it with the box, I tried twice and even tore a part off. To fix the torn part, I would use the mirror paper to fill the missing area. After that, I asked the seller for solution, she suggested me to use the hot air blower to soften the panel and flatten the surface on the platform. Surprisingly, the panel had been flattened in the end, but the drawback was that the silver layer fell off a bit due to the high temperature. Therefore, I decided to use the mirror paper to seal all the gaps.


The effect of sealing with mirror paper was quite good.
However, when a problem has been solved, there will be a new one. After I bonded the prism cube to the Box 2, I found the effect was not good because most of the light was blocked and it was pretty hard to see the reflection image clearly. Therefore, I decided to remove it, so the opening of the funnel would point to the mirror on the Box 3.


Comments